Sign-up form and QR code
Let customers join by themselves — edit the sign-up form, connect its answers to the pass, and share or print the sign-up QR code.
Every template can have a public sign-up page. A customer scans a QR code at your counter or opens a link, fills in a short form, and gets the pass in their wallet — no staff involved. Their answers can go straight onto the pass.
Before you start#
- The sign-up page is open whenever the template's form has at least one field. New Generic and Loyalty templates start with Full name, Email Address and Phone Number, so their page is open from the start. Other types open once you add a field.
- Decide which values the pass needs from the customer, such as their name. See Fields.
How a customer joins#
- The customer opens the sign-up page — by scanning your sign-up QR code, or from a link. The page wears your template's colours and logo.
- They fill in the fields, tick the consent box if you added one, and tap the button.
- Walletap creates the member and their pass, and opens the pass page, where they add it to Apple Wallet or Google Wallet.
The new member appears on the template's Members tab like any other. The sign-up page
lives at https://enroll.walletap.com/ followed by the template ID.
Edit the sign-up form on the web#
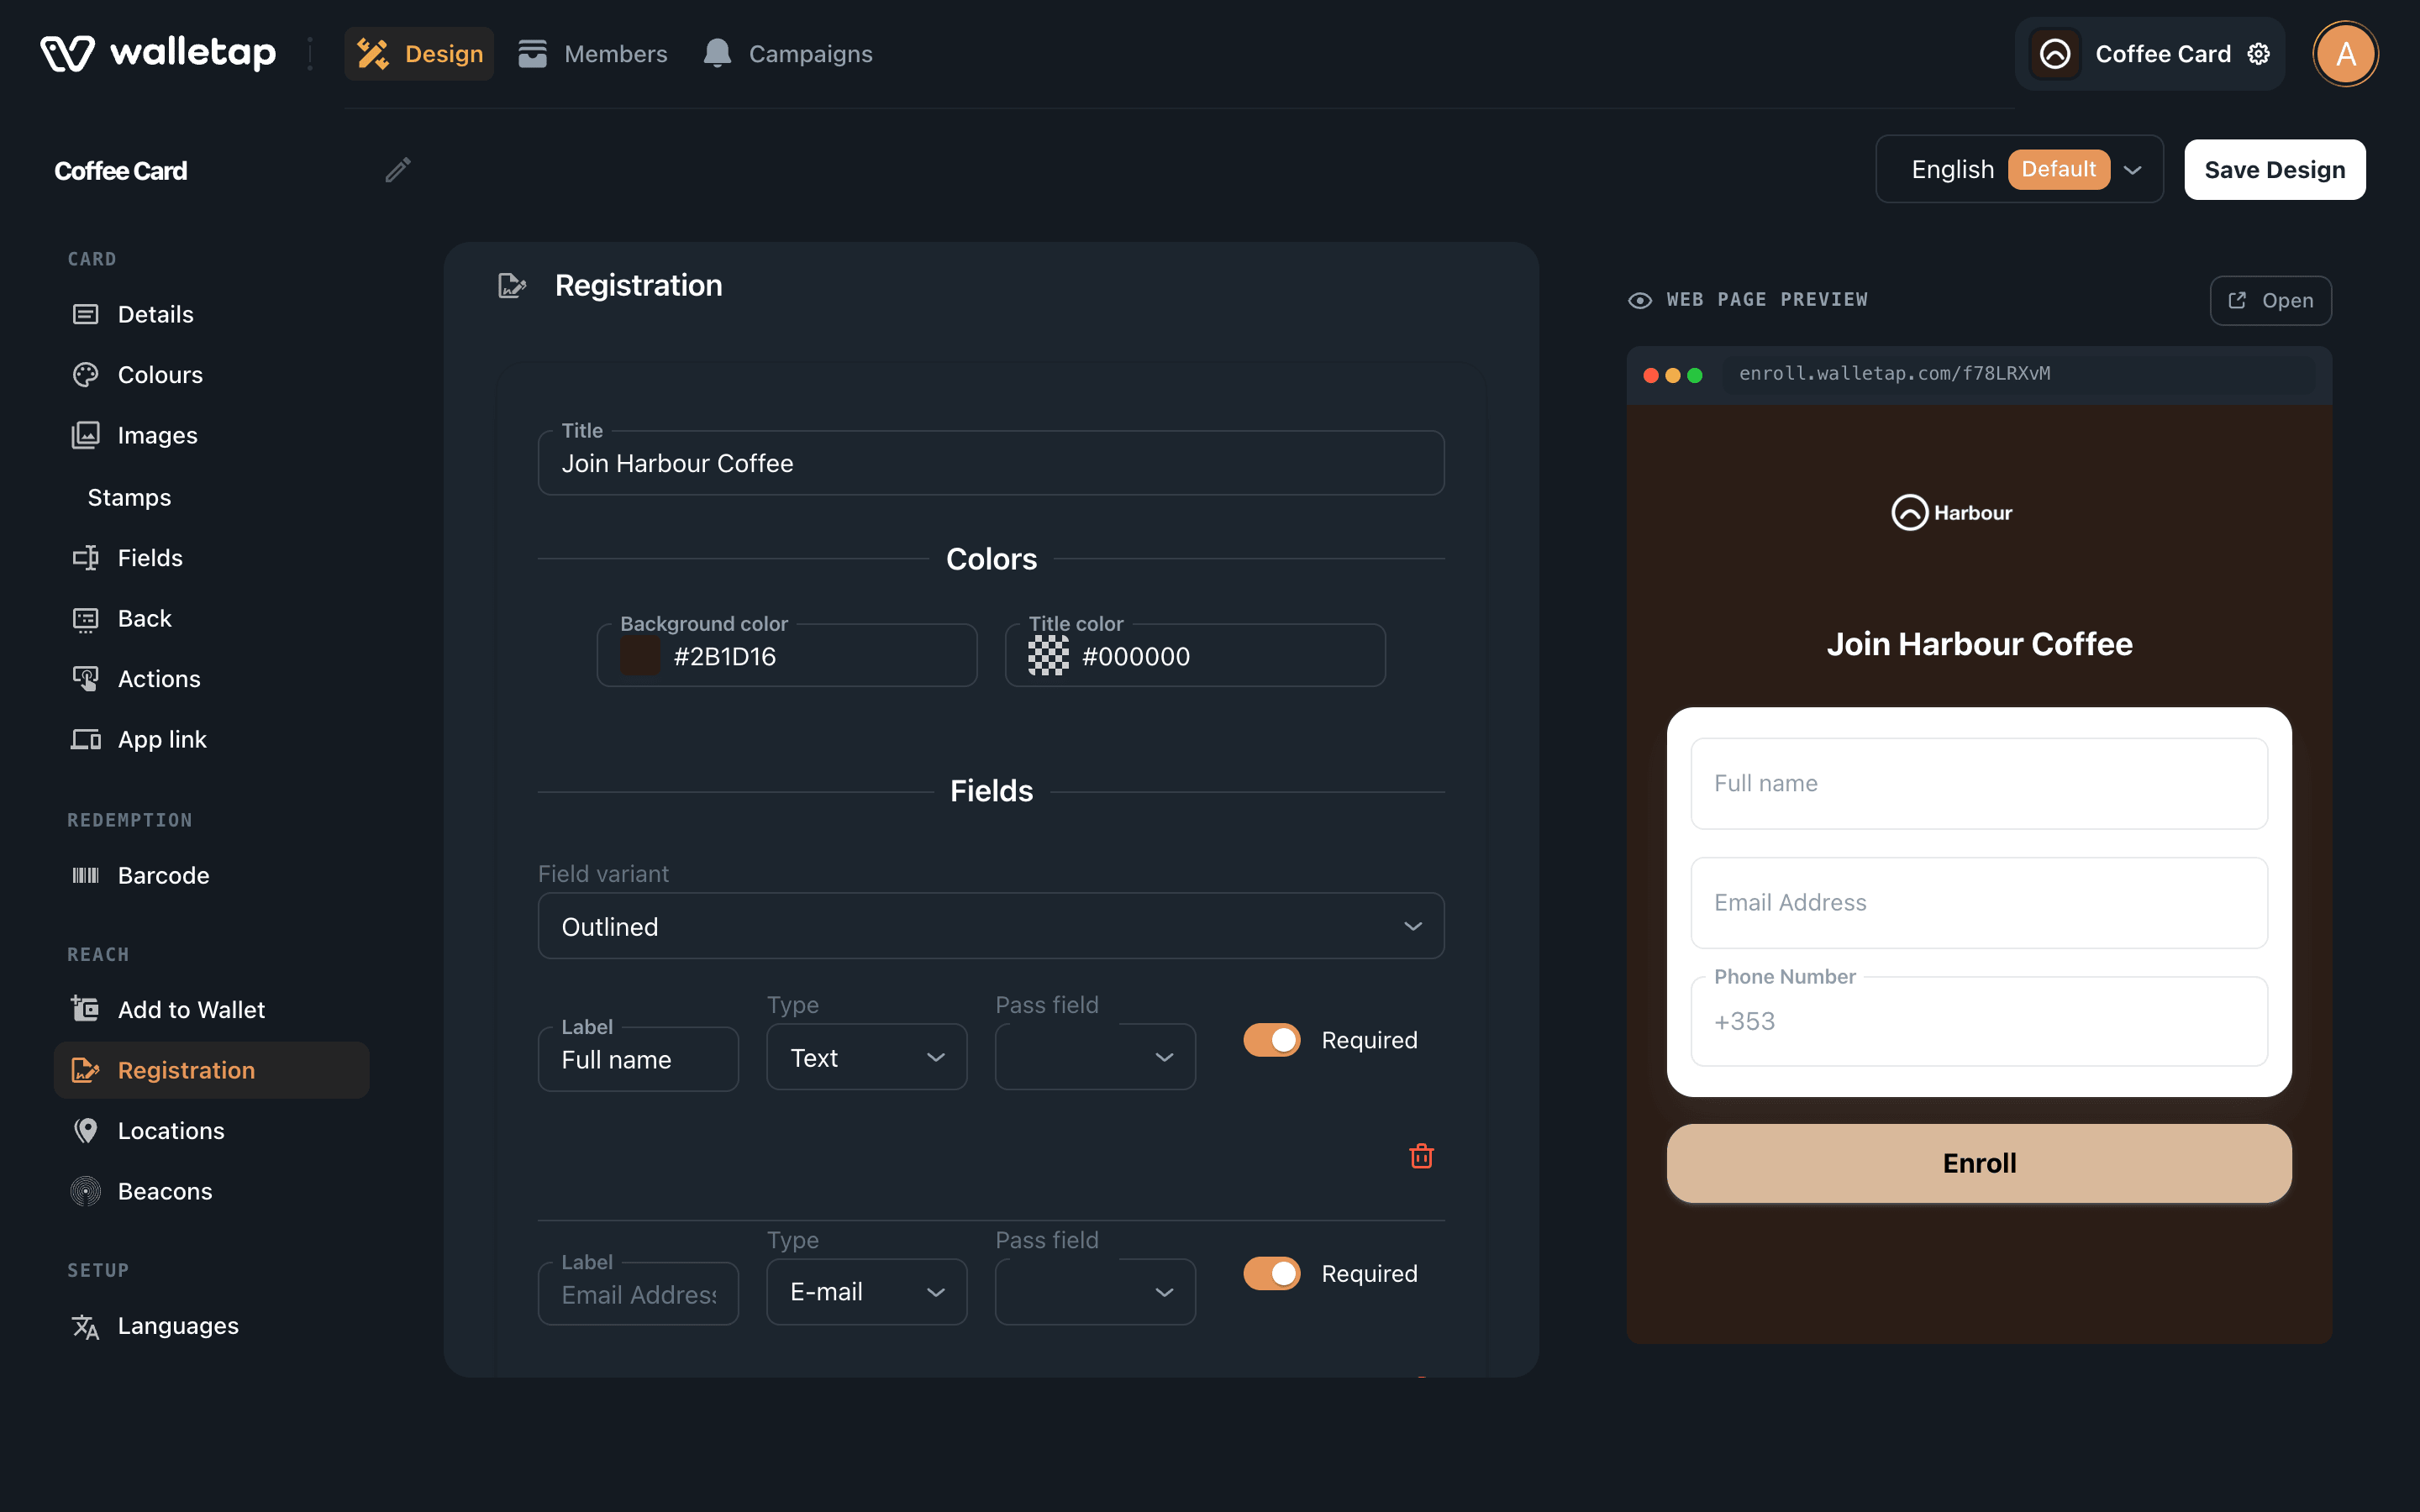
Open TemplatesCoffee CardDesignRegistration. The preview on the right shows the page as customers see it; Open opens the live page in a new tab.
- Set the title and colours
Enter the Title customers see at the top, for example Join the Coffee Card. Under Colors, set the Background color and Title color. The page starts with the pass's background colour.
- Choose the field style
Pick a Field variant — Filled, Outlined or Standard — for how the input boxes are drawn.
- Add the fields
Click Add field and choose its Type: Text, Full name, E-mail, Phone, Birthday or Gender. Only a Text field takes your own Label. Switch on Required for answers the customer must give. The bin icon removes a field.
- Connect fields to the pass
For each answer that belongs on the pass, choose the matching Pass field. See Connect a sign-up field to the pass.
- Add consent and the button
Under Consent, enter the agreement the customer must accept; the page shows it with a checkbox they have to tick. Under Button, set its Label — for example Join — and Button color.
- Save
Click Save Design. The live page updates straight away.
To link your privacy policy or terms in the consent text, write the link as an HTML
anchor, for example <a href="https://harbour.example/privacy">privacy policy</a>. The
page turns it into a link.
Connect a sign-up field to the pass#
An answer reaches the pass only through its Pass field. Without one, it is saved on the member but never shown on the card.
The Pass field menu lists the fields on the front of the pass that take a value per member: the headline, the top row and the row. Pick the one that should show the answer. On Coffee Card, for example, set Full name to Member name, so each card shows its holder's name.
Only connect fields the customer should fill in. A field such as Points or Balance would let a customer give themselves a starting balance.
The same form drives the New member dialog in the dashboard: staff are asked for the same fields when they add someone by hand. See Add members.
Share or print the sign-up QR code#
The sign-up QR code lives in the mobile app.
- Open Member sign-up
In the mobile app, make the template the active one, then go to SettingsMembersMember sign-up and stay on the QR code tab.
- Choose the location
With more than one location, pick the Location the code is for. It starts on the location this phone works at; Any location records none. See One code per location.
- Choose a design
Tap one of the four designs under the preview:
- Pass — your pass's colour, logo and name, so the code looks like the card.
- Sign-up — the sign-up page's colours, title and button.
- Minimal — black on white, cheap to print and easy to scan.
- Bold — the code itself drawn in your brand colour.
- Share, print or copy
Tap Share to send the poster as an image, with the link, through any app on the phone. Tap Print to print it on an A4 page, or save it as a PDF from the print dialog. Copy link copies the address alone.
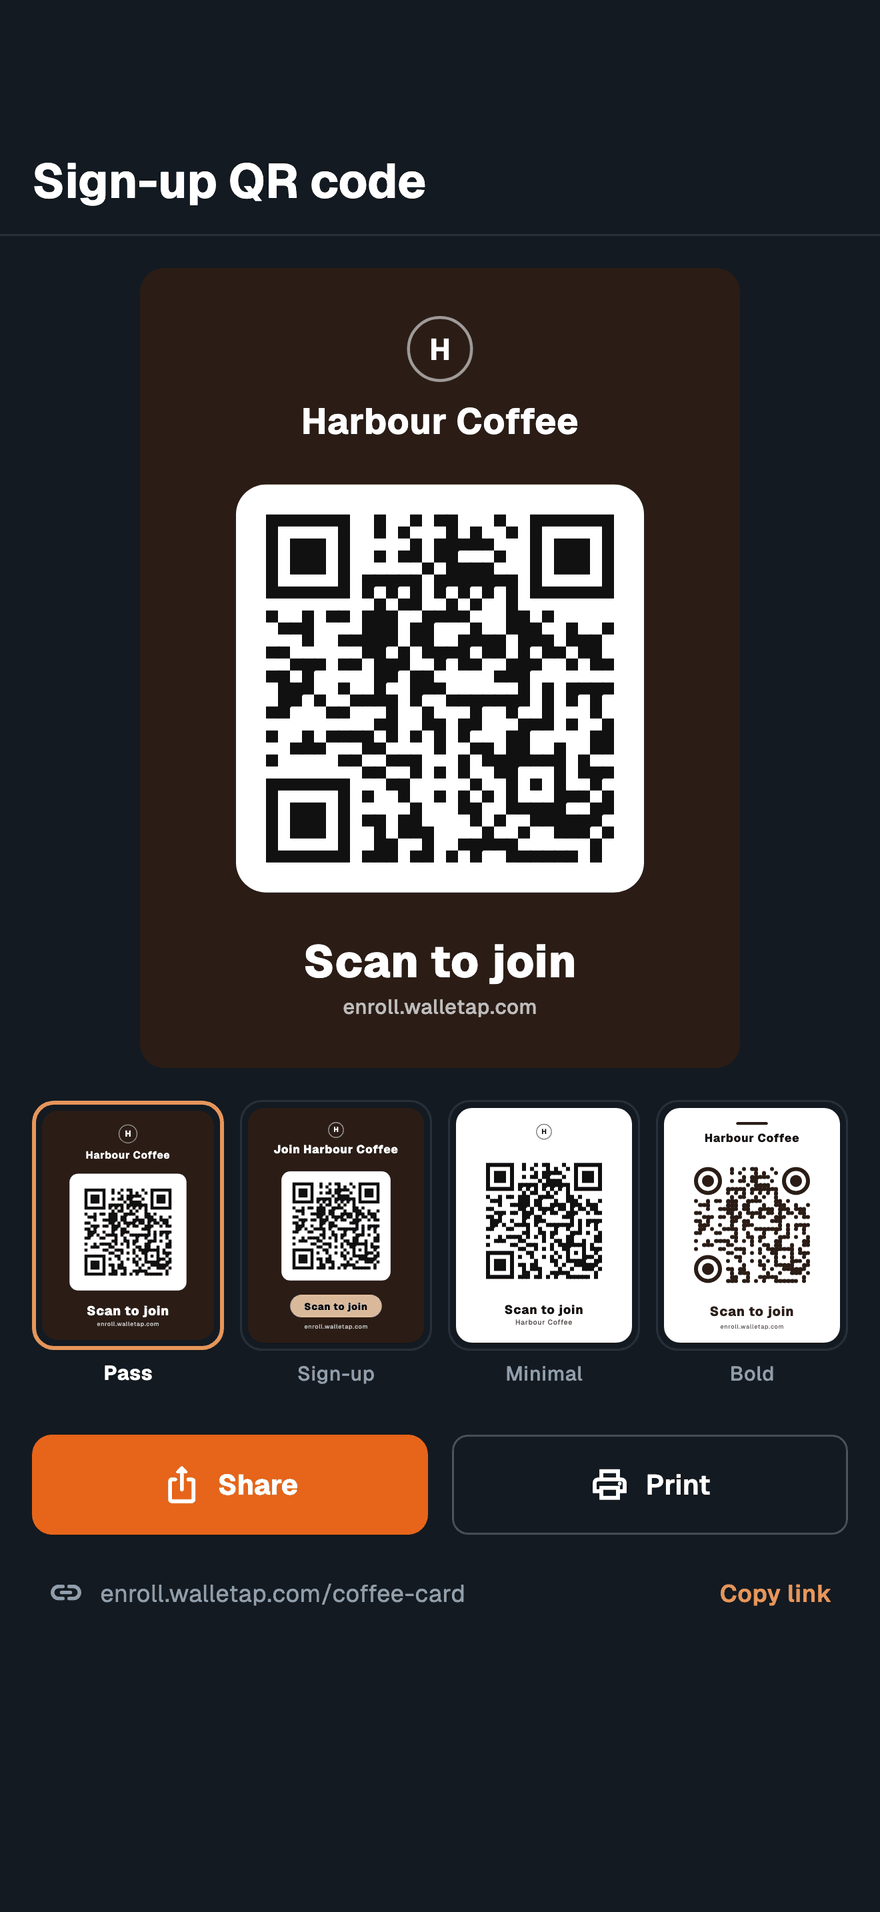
The app remembers the design you last used for each template, so a reprint matches the poster already on the wall. The Form tab beside QR code edits the sign-up form on the phone: its look, title, fields, consent text and a link to your programme's details.
When you create a template in the app and choose They scan a QR code or Both, the app shows the same QR code as soon as the template is ready.
One code per location#
A sign-up through a location's code records that location on the member's card, which is what per-location reports count. A chain like Harbour Coffee can print one poster for Old Town and one for Marina, both for the same Coffee Card.
- In the mobile app, pick the Location before you share or print.
- On the web, go to SettingsLocations and click the QR icon beside a location. Enrolment links lists every template whose sign-up is open; click the copy icon to copy that template's link for the location.
If something goes wrong#
"Sign-ups for this card are paused right now. Please ask a member of staff." — the account's new cards are paused. See Billing.
"Error: Failed to create pass: 403" — the form has no fields, so sign-up is closed. Add at least one field in Registration.
"Error: Failed to create pass: 429" — too many sign-ups came from one network, or to one template, in a short time. Ask the customer to try again a little later, or on mobile data instead of your Wi-Fi.
The pass shows no name — the form's name field has no Pass field. Connect it as in Connect a sign-up field to the pass. Passes issued before the change keep showing no name.
No card design has sign-up open. (in Enrolment links) — none of the templates has a field in its sign-up form yet.